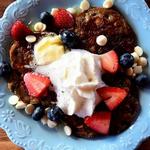
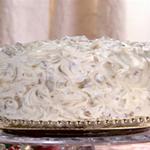
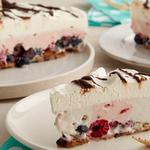
Wedding cake with white chocolate and berries
Votes: 6


Time: 4 hours 40 minutes
Complexity: average
Servings: 15 - 20
Complexity: average
Servings: 15 - 20
An elegant four-tier wedding cake with delicate white chocolate layers, layered with white chocolate frosting and fresh berries. Each tier is covered with fondant and decorated with royal icing. You can tint the fondant to your liking or in traditional wedding colors like light green, mint, and so on, and decorate the cake with ribbons and frosting in a matching color scheme. This recipe makes one 25 cm (9 in) cake. Therefore, for a four-tier wedding cake, you'll need to increase the amount of ingredients for the layers by six times and for the frosting by eight times. The assembled cake can rest at room temperature for three hours.
The recipes use measuring containers with the following volumes:
1 glass (st.) - 250 ml.
3/4 cup (st.) - 180 ml.
2/3 cup (st.) - 160 ml.
1/2 cup (st.) - 125 ml.
1/3 cup (st.) - 80 ml.
1/4 cup (st.) - 60 ml.
1 tablespoon (tbsp) - 15 ml.
1 teaspoon (tsp) - 5 ml.
1/5 teaspoon (tsp) - 1 ml.
1 glass (st.) - 250 ml.
3/4 cup (st.) - 180 ml.
2/3 cup (st.) - 160 ml.
1/2 cup (st.) - 125 ml.
1/3 cup (st.) - 80 ml.
1/4 cup (st.) - 60 ml.
1 tablespoon (tbsp) - 15 ml.
1 teaspoon (tsp) - 5 ml.
1/5 teaspoon (tsp) - 1 ml.
Ingredients for the recipe:
Wedding cake
- 2/3 cup butter at room temperature
- 1 and 1/3 cups sugar
- 4 large eggs at room temperature
- 2 tsp vanilla extract
- 2 and 1/4 cups premium flour
- 2 tsp baking powder
- 0.5 tsp salt
- 1 and 1/4 cups semi-skimmed milk at room temperature
- 240 g white chocolate, chopped
- 3 cups assorted fresh berries
White chocolate cream
- 2 cups of butter at room temperature
- 450 g white chocolate, melted and cooled to room temperature
- 2 cups sifted powdered sugar
- 2 tsp vanilla extract
- 1/4 teaspoon salt
Decorating
- Cake pan with a diameter of 35 cm and a height of 7.5 cm.
- Cake pan with a diameter of 25 cm and a height of 7.5 cm.
- Cake pan with a diameter of 20 cm and a height of 7.5 cm.
- Cake pan with a diameter of 15 cm and a height of 7.5 cm.
- 3 cardboard backings with a diameter of 25, 20 and 15 cm respectively
- 1 cake stand with a minimum diameter of 40 cm.
- Untreated wooden rod
- 1 pastry spatula
- Pastry bags and tips
- Small leaf cutouts made from mastic
- Green satin ribbon, 2.5 cm wide, approximately 2 m dark green and 1 m light green
- Rotating cake stand
Floral ornament
- 0.5 cups of warm water
- 4.5 cups sifted powdered sugar
We recommend


Recipes with similar ingredients: premium flour, white chocolate, eggs, milk, powdered sugar
Cooking the dish according to the recipe:
- Using a stand mixer or hand mixer, beat the butter until fluffy. Beat in the cooled melted white chocolate at medium speed. Reduce the mixer speed to low and beat in the powdered sugar, vanilla, and salt (the cream will be slightly soft). Refrigerate for at least 1 hour to set before using.
The frosting can be made in advance and refrigerated for up to a week, or wrapped and frozen for up to a month (defrost in the refrigerator). After defrosting, whip the frosting until fluffy and spread it on the cake layers.. - Preheat oven to 160°C. Grease a 25cm diameter cake tin, dust it with flour, and line the bottom with parchment paper.
Wedding cake with white chocolate and berries
Using a stand mixer or hand mixer, beat the butter and sugar until fluffy. Add the eggs one at a time, mixing well after each addition, and add the vanilla.- In a separate bowl, sift the flour, baking powder, and salt. Add the flour to the butter mixture in 4 additions, alternating with the milk, mixing well after each addition.
- Melt the chocolate in a bowl over simmering water, stirring until almost melted. Remove the chocolate from the water bath and continue stirring until completely melted. Pour the warm chocolate into the dough and mix.
- Pour the batter into the prepared pan and bake until a tester inserted into the center comes out clean, about 45 minutes.
- Cool the cake for 30 minutes, then remove from the pan to cool completely. Wrap the cake and store in the freezer or at room temperature until ready to assemble.
- To assemble, cut the sponge cake horizontally into three pieces. Spread about 2/3 cup of frosting on the bottom layer and 1/3 cup of frosting on the next layer.
- Sprinkle the berries over the cream-covered bottom layer and top with the second layer of cake, cream side down, so that the berries are completely pressed into the cream.
- Repeat with the next layer. Spread the frosting over the top and sides of the finished cake and smooth it out. Refrigerate.
Mastic
To tint the mastic, add a little food coloring to a small bowl with mastic (about 0.5 cup) and knead well.
Combine the small tinted piece with a large portion of fondant (weighing about 1.3 kg for a 35 cm diameter cake, 0.7 kg for a 25 cm diameter tier, 0.45 kg for a 20 cm diameter tier and 0.2 kg for a 15 cm diameter tier) and knead by hand or using a mixer with a paddle attachment (a hand mixer will not work).
This cake uses a darker green fondant color on the bottom tier, gradually fading into a lighter green top tier.- To color the mastic more intensely, add more dye for a brighter tone, or more mastic for a lighter tone.
Decorating
Lightly dust your work surface with powdered sugar and begin rolling out the darkest piece of fondant for the bottom tier, measuring 35 cm in diameter. Roll it out into a 5 mm thick circle. Keep the remaining fondant covered at all times. Place the rolled-out fondant on a rolling pin and carefully transfer it to the 35 cm diameter cake.- Place the fondant on the cake and gently press it into the frosting with your hands. Trim the fondant at the base of the cake and smooth the entire surface with your hand using circular motions to ensure a smooth finish. If air pockets appear in the mastic, prick them with a pin to release the air and gently fill the hole with your finger..
Cover the remaining tiers of the cake with fondant in the same manner. Use a special cutter to cut out leaves from the fondant scraps and set them aside (it's okay if they dry out). Cake tiers
To assemble all the cake tiers, they need to be reinforced with wooden dowels. Insert a wooden dowel into the bottom tier, 10 cm from the edge.
Mark the top of the cake on the dowel and remove it. Cut the dowel at the mark and cut four more dowels of the same length (these will ensure your cake stands up straight). Insert the dowels into the bottom tier in a circle and carefully place a 25 cm diameter cake on top.
Strengthen the tiers with a diameter of 25 and 20 cm in the same way.
When transporting a cake of this size and weight, it is recommended to move it in two pieces and assemble it once it's ready. Place the two bottom tiers and the two top tiers together..Floral ornament
Start decorating the cake with the bottom tier, wrapping it with green ribbon. Fill a piping bag fitted with a small plain tip with green royal icing and pipe a stem sprouting from the ribbon.
Use royal icing to adhere the leaves to the stem. Continue decorating each tier with royal icing (you can decorate the cake however you like or use the photo of this cake for inspiration).
Royal icing: Combine all ingredients and beat with a mixer on high speed until the frosting is stiff, about 7 minutes.
Tint the icing to your desired colors. Place plastic wrap directly on the surface and keep at room temperature until ready to use.
Author of the recipe - Anna Olson is a pastry chef and television host.
Categories:
recipe / Festive dishes / Wedding dishes / Desserts / Cakes
Similar recipes