10 ways to decorate the edge of a pie
Votes: 1
We'll show you step-by-step how to roll out and shape the dough for the pie and beautifully decorate its edges.

Author: Jessie Sheehan, baker and cookbook author
Decorating pies with fillings is no easy task. Even the dough itself can be difficult to knead, and then you have to decorate it and pray that all the curves and curls stay in place after baking. But don't worry, we're here to help. In this article, we'll share ten ways to beautifully decorate the edge of a pie (with both simple and complex designs), and we'll also teach you how to ensure your decorations will withstand the test of a hot oven.
And here's the first little secret for you: Even the simplest decoration with fork tines will make a slice of pie with filling look appetizing. This design looks homey and cozy, as if we just decided to whip it up, although we can do more complex things. But it's more fun to really go wild and decorate the edges with braids or other dough shapes. In fact, if you work carefully, chilling the dough periodically, you'll quickly learn to decorate it like a pro.
How to roll out dough for pie
Step 1: Prepare your work surface
So, you've kneaded the dough and are ready to roll it out. You'll need a clean work surface (a large cutting board will do). Knead the dough a few minutes before you use it and dust the surface with flour.

Step 2: Soften the dough
Knead the dough with a rolling pin until it becomes soft. Any rolling pin will do. The dough should be of uniform thickness.

Step 3: Roll out the dough
Roll the dough outward from the center. To prevent it from sticking, sprinkle a little flour underneath. Adjust the pressure as you roll until you have a circle 0.5–0.3 cm thick.

Step 4: Place the rolled out dough on a rolling pin and transfer it to the pan.
Carefully roll the dough onto the rolling pin and place it into the pie pan.
Advice: Do not stretch the dough when transferring it, otherwise it may wrinkle during baking.

Step 5: Trim the dough
Trim any excess dough with kitchen scissors, leaving a 3.5 cm (1.5 in) edge to fold over later. Refrigerate the pan with the dough as directed in the recipe.

Step 6: Fill the pie with filling and cover with dough
Fill the pie with the filling and roll out the top layer of dough. If you're making a closed pie, the bottom layer should be approximately 30 cm in diameter, and the top layer should be 25 cm. Once you've rolled out the second layer of dough, carefully place it on top of the filled pie and trim off any excess, just as you did with the bottom layer. Fold the overhanging edges of both layers under and press them so that the dough fits the edge of the pan. You can shape the edges of the pie in several ways.

Step 7: Make sure the dough is cold enough
Before you begin decorating the rim, make sure the dough is properly chilled. It shouldn't be too hard, otherwise it will tear when you try to press it. Ideally, the dough should be pliable and easy to shape.
How to decorate the edge of a pie
1) Crimping with a fork
This is the easiest method: simply press the tines of a fork against the edge of the dough, creating small indentations facing the filling. Rotate the pan with the dough until you've created a pattern around the entire circumference.

2) Crimping with a fork crosswise
Here's another very simple decorating technique, which is essentially a variation on the standard fork-press method. After you've pressed the tines of the fork into the edge of the dough all the way around, turn the fork at a different angle and press the tines along the edge so that the indentations are now perpendicular to the original ones. You should end up with a lattice-like pattern.

3) Pressing with a citrus juicer
It's a bit of a strange method, but it turns out beautifully! Press the edge of the dough with the grooved part of a citrus juicer, leaving wide lines.


4) Classic crimping
This is perhaps the most popular way to decorate the edge of a pie. All you need is both your index fingers and one thumb. Basically, you make a V-shaped curve around the entire edge of the dough, pressing lightly with your thumb and index fingers, pointing the pointed end of the "V" away from the filling, with the next pointed end pointing inward, and so on around the circle.


We recommend


1. You can cut out shapes using any small cookie cutters. To do this, roll out the dough scraps or knead another batch if you have time and inclination. Cut out tiny flowers, hearts, or circles.

2. Grease the edge of the dough with beaten egg, grease the figures and glue them to the edge around the entire circumference, slightly overlapping.

6) Pleating
1. Lightly flatten the thick edges of the dough in the pan and make small diagonal cuts with scissors.

2. Carefully fold the strips upwards, towards the filling, one after the other, pleating the dough in a circle.


7) Pigtail
1. Using a ruler and a pizza cutter or small sharp knife, cut 9 thin strips of dough, long enough to cover a third of the circumference of your pie.

2. Braid three strips into pigtails, straightening and smoothing them.

3. Brush the edges of the dough in the pan with beaten egg to help the braids stick better, and place three braids along the edge, pressing lightly.


8) Chess pattern
1. Make cuts along the edge of the dough in the pan to make squares.

2. Fold every second square towards the center of the pie.

3. If the edges become too soft, place the dough in the refrigerator and let it firm up a bit.

4. If you are baking the crust without filling, place a ring of foil under the edges for support.

9) Letters
1. Using blank letter stamps, write words around the edge of the pie.

2. Press firmly enough so that the indentations remain after baking. Chilling the dough before baking also helps preserve the imprinted letters.

10) Tape
1. Form the ribbon by folding the strip of dough into large loops.

2. Trim the excess dough around the edge of the pan. There's no need to thicken the edge. Glue the dough strip to the edge, brushing it with beaten egg.

3. With this decoration, the pie will bake a little longer, and the cut pieces will look more impressive.

How to ensure your decor will hold its shape when baking
Once you've finished decorating the edge of the pie, brush it with beaten egg for a nice golden brown, and place the pan in the freezer for an hour to set. This will help the designs hold their shape during baking. You can also brush the edges with egg wash after the pie has been in the freezer for an hour.
What can I do to prevent the edge from burning?
Because the pie crust is very delicate, it can burn before the rest of the pie is fully baked. To prevent this, cover either the entire pie or just the edges with foil. Alternatively, look for a special silicone edge protector with adjustable diameter.
Recipes for pies with different sides
In our recipes, you'll see various ways to decorate the edge of a pie in action.

Classic Apple Crumble Pie
Here's a great example of how simple and gorgeous a fork crimp can be, especially when combined with streusel.
Recipe: Classic Apple Crumble Pie

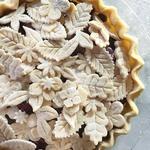
Pie with stars and pear filling
This recipe is a great example of how beautiful pies can be when decorated with dough figures. This pie features stars not only along the edge, but also throughout the filling.
Recipe: Pie with stars and pear filling

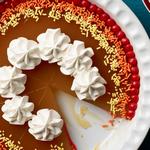
Cranberry pie
This recipe simply says to "crimp the edges nicely," but the photo shows a great example of a classic crimp.
Recipe: Cranberry pie

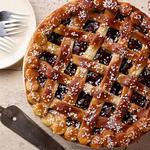
Blackberry pie
And in this recipe we see a combination of the classic crimping along the edge and decorating with dough figures on top of the filling.
Recipe: Blackberry pie
Author of the recipe - Jessie Sheehan, baker and cookbook author
Categories:
Similar recipes